Google and other search engines are now considering page speed as one of the performance matrices when displaying search results. This means that websites that load faster will appear more prominently in search results.
Performance measurement tools
I prefer GTmetrix, since it lets you save your site’s performances.
Make sure that you are logged out of your WordPress site when you run the test.
In GTmetrix, in the Waterfall chart, check that you have no 301 Moved or 302 Moved errors, and that all your requests have a 200 OK status.
Testing Times and Locations
When possible, try both geographically close and distant test locations to see the load time differences for your site. You should also test more than once because multiple tests can show different loading time results. You also might want to try testing at a different time as perhaps the fluctuation is due to server load.
Also, you can test how much concurrent traffic your site can handle. To do so, go to Load Impact and run a free test on your site.
What Load Impact does is that it actually creates 25 concurrent (bot) users, and sends them over to your site in order to see how the site performs under load. The test takes place over the duration of five minutes.
When the test is done, you get a nice summary + chart.
At first glance, this seems complicated, but you can actually read that chart pretty easily. Basically, all that matters is this:
(!) You want the green line – representing your load time – to be as flat as possible. If it goes up, it means that your site performance can be improved.
Here are some tricks to increase your speed score when testing with Google page speed or Yslow.
Enable HTTPs and check if You’re Using HTTP/2
The HTTP/2 test checks if your hosting is using the latest version of HTTP. Some hosts don’t support HTTP/2, but they should, and you will need to contact them and request an upgrade.
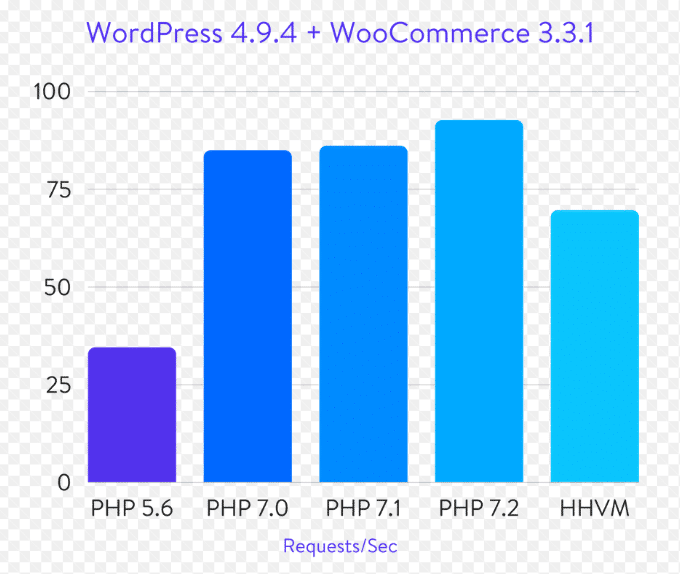
Upgrade PHP version
Upgrading PHP versions is literally the easiest thing and can make your site 2-3x faster. For example, wordPress on PHP 8.1 can handle 47.10% more requests per second than PHP 8.0. Make sure you update today!
After changing the PHP version to it’s latest version (eg. 8.3), make sure that you check the site (frontend and backend) to see that everything works as expected. If not, lower your version a bit and repeat until you find a compatible version with your site.
Disable unneeded PHP extensions
Here is a list of PHP extensions you can disable:
| Extension | Safe to Disable? | Reason |
|---|---|---|
bcmath |
✅ Probably | Needed only for plugins doing arbitrary precision math (e.g. some crypto or finance). |
calendar |
✅ Yes | Rarely used in WP. |
enchant |
✅ Yes | Spellcheck library — not used by core WP. |
ftp |
✅ Yes | WP uses HTTP APIs for updates now. |
imap |
✅ Yes | Only needed if parsing email (like some contact forms with IMAP piping). |
pcntl |
✅ Yes | Process control — CLI-only and useless in web context. |
pspell |
✅ Yes | Another spellcheck module — rarely used. |
readline |
✅ Yes | Only used in CLI mode (like artisan/tinker in Laravel). |
shmop, sysvmsg, sysvsem, sysvshm |
✅ Yes | Shared memory/message queue extensions — almost never needed by WordPress. |
soap |
✅ Usually | Only needed if a plugin integrates with SOAP APIs (like ERPs, CRMs). |
tidy |
✅ Yes | HTML tidy library — unless you’re cleaning malformed HTML, not needed. |
xsl |
✅ Yes | XSLT transformations — rarely needed. |
Enable OpCache
You can speed up your WordPress site so it’s around three times faster or more with the OPcache PHP OPcode caching system.
OPcache is a type of caching system that saves precompiled script bytecode in a server’s memory called a cache, so each time a user visits a web page, it loads faster.
Make sure that you enable it since it can help reduce CPU usage.
Replace WP-Cron With A Real Cron Job
The wp-cron is loaded on every pageview and schedules automated tasks like publishing scheduled posts, checking for theme and plugin updates, sending email notifications, etc. Replacing this with a real cron job gives you better control and can help reduce CPU usage.
The first step is disabling the built-in wp-cron. To do so, add the code to your wp-config.php file before where it says “That’s all, step editing! Happy blogging.”
define('DISABLE_WP_CRON', true);
Now we’ll set up an external cron job. Open your cPanel, go to cron jobs and add a new cron job every 15 minutes.
wget -q -O - https://yourwebsite.com/wp-cron.php?doing_wp_cron >/dev/null 2>&1
Clean scheduled tasks
Open phpmyadmin and run these:
Delete completed tasks
DELETE FROM wp_actionscheduler_actions
WHERE status = ‘complete’;
Delete failed tasks
DELETE FROM wp_actionscheduler_actions
WHERE status = ‘failed’;
Delete associated logs (from actionscheduler_logs table) if you have that:
DELETE FROM wp_actionscheduler_logs
WHERE action_id NOT IN (
SELECT action_id FROM wp_actionscheduler_actions
);
Leverage browser caching
First and foremost, please leverage browser caching. You will see a huge impact on your site’s performance.
Why? When a web browser displays your webpage it has to load several things like your logo, your CSS file, and other resources.
What browser caching does is “remember” the resources that the browser has already loaded. When a visitor goes to another page on your website your logo, CSS files, etc. do not need to be loaded again, because the browser has them “remembered” (saved). This is the reason that the first view of a web page takes longer than repeat visits.
When you leverage browser caching, your webpage files will get stored in the browser cache. Your pages will load much faster for repeat visitors and so will other pages that share those same resources.
To enable browser caching with WP Rocket, all you have to do is to install and activate it. This is where the magic starts. WP Rocket will set expiration lengths on certain types of files and will modify your .htaccess file with the corresponding rules.
Minify JavaScript and CSS
Minification is the practice of removing unnecessary characters from code to reduce its size thereby improving load times. When code is minified all comments are removed, as well as unneeded white space characters (space, newline, and tab). In the case of JavaScript, this improves response time performance because the size of the downloaded file is reduced.
To do so, go and tick WP Rocket > File optimization > Minify CSS as well as WP Rocket > File optimization > Minify Javascript.
Compress components with Gzip
Just add the code below inside your htaccess. It will work only if your server has GZIP Compression enabled. If not, contact your hosting provider.
If you want to check if compression is turned on your server, you can visit this link.
<IfModule mod_deflate.c>
AddOutputFilterByType DEFLATE text/html
AddOutputFilterByType DEFLATE text/css
AddOutputFilterByType DEFLATE text/javascript
AddOutputFilterByType DEFLATE text/xml
AddOutputFilterByType DEFLATE text/plain
AddOutputFilterByType DEFLATE image/x-icon
AddOutputFilterByType DEFLATE image/svg+xml
AddOutputFilterByType DEFLATE application/rss+xml
AddOutputFilterByType DEFLATE application/javascript
AddOutputFilterByType DEFLATE application/x-javascript
AddOutputFilterByType DEFLATE application/xml
AddOutputFilterByType DEFLATE application/xhtml+xml
AddOutputFilterByType DEFLATE application/x-font
AddOutputFilterByType DEFLATE application/x-font-truetype
AddOutputFilterByType DEFLATE application/x-font-ttf
AddOutputFilterByType DEFLATE application/x-font-otf
AddOutputFilterByType DEFLATE application/x-font-opentype
AddOutputFilterByType DEFLATE application/vnd.ms-fontobject
AddOutputFilterByType DEFLATE font/ttf
AddOutputFilterByType DEFLATE font/otf
AddOutputFilterByType DEFLATE font/opentype
# For Olders Browsers Which Can't Handle Compression
BrowserMatch ^Mozilla/4 gzip-only-text/html
BrowserMatch ^Mozilla/4\.0[678] no-gzip
BrowserMatch \bMSIE !no-gzip !gzip-only-text/html
</IfModule>
Minimize HTTP Requests
80% of the end-user response time is spent on the front-end. Most of this time is tied up in downloading all the components in the page: images, stylesheets, scripts, Flash, etc. Reducing the number of components in turn reduces the number of HTTP requests required to render the page. This is the key to faster pages.
Make sure you only use scripts and stylesheets that you actually use.
Check disc space usage
Install the Disk Usage Sunburst plugin. You can use it to take a quick look of what’s eating space.
Optimize images
Install the EWWW Image Optimizer.
The EWWW Image Optimizer will strip the image metadata by default, which in some cases can reduce the image size dramatically.
In general, make sure that the images that you upload to your WordPress site are web optimized. In PhotoShop the preferred way is to save images for web (this also strips the JPEG metadata). It is also advised to not let the user upload images more than 1MB.
Lazy load images
Lazy-Loading images is another extremely important and easy optimization to make which can help significantly improve your website’s loading times.
When lazy loading isn’t implemented, all media files (such as images and video thumbnails) are loaded on the initial page load even if they are not visible as the user hasn’t scrolled down. This obviously slows down your website if you have a number of images on your website’s posts or pages.
Lazy Loading is a technique which saves load time by loading images and other heavy assets only when a visitor scrolls to the point on a webpage where they appear.
Avoid an excessive DOM size
PageSpeed Insights (Lighthouse) flags pages with DOM trees with:
- More than 1,500 nodes total.
- A depth greater than 32 nodes.
- A parent node with more than 60 child nodes.
Lighthouse flags pages with DOM trees that:
- Warns when the body element has more than ~800 nodes.
- Errors when the body element has more than ~1,400 nodes.
A really handy chrome tool is Dom-Analyzer. To use it:
- Open the site in incognito mode.
- Turn on the analyzer.
- Click the desired element.
- Click console.
- Click nodes.
- Look at children.
If you use elementor:
- Make sure that no sections are hidden in your page (by using the Responsive Visility feature). If you do not need them, delete them, because they are still rendered.
- Use only containers (not sections).
Optimize revolution slider
If you use a revolution slider, make sure you enable lazy loading. For example, if you use a revolution slider with 10 images, you do not want to load all 10 images at the first load. To do so:
- Go to Module General Options > Advanced
- Set Lazy Loading to Single.
Also, make sure you do not load font awesome and google fonts if you do not use them. To do so:
- Go to Global Settings
- Set the Disable RS Font Awesome Library to ON
- Enable google font download to Disable, load you own
Remove Unused Image Sizes
Many themes, may create image sizes that you may never need in your site.
Don’t forget to stop the theme from regenerating the thumbnails in the future. To do so, you can again use EWWW Image Optimizer or Better Images Sizes.
Just go to the resize settings tab and tick the disable creation checkbox for any images that you do not need.
WP All Import
If you run imports, you may get a huge uploads folder for wp all import. To clean it:
- Go to WP All Import > Settings and click the Cleanup button.
- Delete the sub-folder(s) inside the /wp-content/uploads/wpallimport/logs/ folder
- Delete any files you dont want inside /wp-content/uploads/wpallimport/uploads/ folder
WP All Export
- Go to WP All Export > Manage Exports.
- Delete any export you don’t want.
Elementor form submissions
- Go to Elementor > Submissions.
- Delete any submissions you don’t want.
Replace very large media
Maybe your site’s administrator has already fill up your server with very large photos. In order to make them smaller, download the uploads folder, use a software like ACDSEE to batch compress your images (for example resize the really big images using 1000px width and 75% quality) and reupload them using FTP. This way, you will compress your images without affecting the database connections of your media attachments (make sure that the filenames remain the same and overwrite your live server images).
Clean existing image sizes
Over time there are various ways that you may end up with unused and unreferenced images. You should delete these images in order to free up space from your server and your database.
To clean existing image sizes, you can use the Thumbnail Cleaner plugin or Force Regenerate Thumbnails plugin. Or you can do so, by running a quick filter on filezilla and deleting them.
Delete All Unattached Images from Media Library
Sometimes we have hundreds of unnecessary images in our WordPress media library. For example, many of our files have not been attached to any post, and have remained in our library without fulfilling any function beyond occupying space and overloading our server.
To delete those:
- Install the Media Library Spreadsheet plugin. It’s a paid plugin but it’s the only that gets the job done efficiently!
- Once you install and activate the plugin, please go to Sheet Editor > Edit Media, and you’ll see the spreadsheet with all your media library files and their complete information.
- Click the search button.
- Tick the Enable advanced filters checkbox and use these values.
Field key: Format
Operator: CONTAINS
Value: image -
Click on Add new and use these values in the new filter.
Field key: Attached to this post
Operator: =
Value: 0 - Set a date range on the bottom if you want.
- Finally, click on Run search. This will filter all your unattached images and take you back to the bulk edit fields.
- To delete the images, click Bulk edit > delete.
- Select Edit all the rows on my current search.
- Click execute.
If the run fails due to server limitations then:
- Go to WP Sheet Editor > Settings.
- In Delete posts faster: Number of posts to delete per batch set a lower number then the default which is 500, eg. 100.
- Rerun and wait.
Serve images in next-gen formats
WebP is an image format that has superior compression and quality characteristics compared to its older JPEG and PNG counterparts. Encoding your images in this format rather than JPEG or PNG means that they will load faster and consume less cellular data.
WebP is supported in Chrome and Opera and provides better lossy and lossless compression for images on the web.
To use WebP images in your site:
- Install and activate EWWW Image Optimizer.
- Go to Settings > EWWW Image Optimizer.
- Click the WebP tab.
- Check the JPG/PNG to WebP option and click Save Changes.
- Again, click the WebP tab. On the bottom right part, you will see a red png image. This means that your site does not serve WebP images.
- Click the Insert Rewrite Rules. This will add some code in your htaccess file and will try to serve WebP images.
- Refresh your page.
- If the image on the bottom right part is a green WEBP image, , this means that your site now serves WebP images and than you can skip the next steps and go to step 6.
- If the Rewrite Rule method failed, check the Alternative WebP Rewriting option and click Save Changes.
- If the image on the bottom right part is now a green WEBP image, this means that your site now serves WebP images.
- If you have already images in your media library, go and optimize them through EWWW Image Optimizer.
To check if your site serves WebP images:
- With google chrome, 0pen a page that has images (for example, the home page).
- Open the Google Chrome console.
- Click the Network tab.
- On the Type column, right next to the images, you should see the webp type.
Remove unused fonts
For example, if you are using a theme and have elementor, you may not need elementor’s default fonts. To disable them:
- Go to Elementor > Settings.
- Tick the Disable Default Fonts checkbox.
Remove font awesome
If you do so, make sure that you show the images as custom svgs (for example social icons, cart icon, etc.)
To do so in elementor:
// Elementor - Remove Font Awesome
add_action( 'elementor/frontend/after_register_styles',function() {
foreach( [ 'solid', 'regular', 'brands' ] as $style ) {
wp_deregister_style( 'elementor-icons-fa-' . $style );
}
}, 20 );
Remove unused plugins
Make sure you only use the plugins you want. Many plugins may add css or javascript that you may not need.
For example, in one site a client had activated the powerkit plugin which added around 30 css (upon deactivation the speed time improved dramaticaly).
Database Optimization
Remove unneeded tables from your database
Your site may contain tables in your database that are no longer needed due to inactive plugins.
To find obsolete tables in your database and remove them:
- Install and activate WP Optimize plugin.
- Go to WP-Optimize > Database.
- Click the Tables tab.
- Search for Not installed right next of the tables and press remove.
Delete Old Post Revisions
By deleting old revisions of posts, you can cut the size of your database down quite a bit.
While this is said not to have any real effect on the speed of your site (revisions are only accessed in the backend), making the size of your database smaller should at least help in working with it (backing it up, moving it around, etc.).
To do so:
- Install and activate WP Optimize plugin.
- Go to WP-Optimize > Database.
- Click the Run Optimization right next to Clean all post revisions.
Remove Spam Comments
If your website receives a lot of spam, you may find that spam comments are taking up a lot of space in your database.
To remove them:
- Install and activate WP Optimize plugin.
- Go to WP-Optimize > Database.
- Click the Run Optimization right next to Remove spam and trashed comments.
Database Table Optimization
Optimizing your database will remove the overhead and reduce the overall size of your database. Many developers note that optimizing a database is akin to defragmenting a hard drive.
Every database will, over time, require some form of maintenance to keep it at an optimal performance level. Purging deleted rows, resequencing, compressing, managing index paths, defragmenting, etc. is what is known as OPTIMIZATION in mysql and other terms in other databases. For example, IBM DB2/400 calls it REORGANIZE PHYSICAL FILE MEMBER.
It’s kind of like changing the oil in your car or getting a tune-up. You may think you really don’t have to, but by doing so your car runs much better, you get better gas mileage, etc. A car that gets lots of mileage requires tune-ups more often. A database that gets heavy use requires the same. If you are doing a lot of UPDATE and/or DELETE operations, and especially if your tables have variable length columns (VARCHAR, TEXT, etc), you need to keep ‘er tuned up.
To do so:
- Install and activate WP Optimize plugin.
- Go to WP-Optimize > Database.
- Click the Run Optimization right next to Optimize database tables.
Clean up wp_options table (autoloaded data)
Why should you remove autoloaded data?
It’s because this type of data is loaded on every page load and often contains data that is no longer used (left behind by already deleted themes/plugins) or left behind because WP-cron wasn’t working and some plugins didn’t clean up after themselves.
How much difference can autoloads make?
HUGE! Freaken huge! I’ve seen awful bloated sites with many MB of autoloaded data. Cleared it all and the whole site felt so much lighter, both on frontend and backend. Keep in mind y’all, the backend can’t be cached. Cleaning autoloads definitely has a measureable impact on massively bloated sites and one of the advanced tasks that separates pros from non-pros.
Step 1. Check autoloaded data size
SELECT SUM(LENGTH(option_value)) as autoload_size FROM wp_options WHERE autoload='yes';
This one shows you how big the autoloaded table is. If you have 500kb or less, you can stop here!
Step 2. List top autoloaded data entries
SELECT option_name, length(option_value) AS option_value_length FROM wp_options WHERE autoload='yes' ORDER BY option_value_length DESC LIMIT 200;
This will list the top 200 autoloaded data entries in the table. Delete the ones you know aren’t being used anymore. Usually the first 10-50 items make up the bulk of your autoloaded data anyway.
Step 3. Find specific autoloaded data
SELECT *
FROM `wp_options`
WHERE `autoload` = 'yes'
AND `option_name` LIKE '%jetpack%'
This command is useful for targeting specific plugins that you KNOW for certain you aren’t using any longer.
Check the original tutorial here.
Convert all MyISAM to InnoDB Tables in your Database
If your website is a few years old, then the chances are that your database is also using an inefficient storage engine.
We recommend that you switch from the less efficient MyISAM storage engine and switch to the faster, more efficient, InnoDB engine.
To check if your database uses MyISAM:
- Head over to your cPanel and look for phpMyAdmin.
- Once you are logged in, click the Databases tab.
- Locate the database for your wp installation, and click it.
- The details of the database will appear. You have to look for the ‘Type’ field in each row and make sure that its InnoDB.
If you see any table that uses MyISAM, then to convert it to InnoDB:
- Make a backup of your database. You can use UpdraftPlus.
- Install and activate Vevida Optimizer.
- Go to Tools > Convert MyIsam to InnoDB.
- Click Convert MySQL tables.
- Wait for the process to be completed and check again your database to see that all your tables are InnoDB.
- Deactivate and uninstall Vevida Optimizer.
Clear WooCommerce customer sessions
Ecommerce plugins such as WooCommerce typically have their own additional cookies they set so that buyers can easily add things to their cart, store for later when they checkout, and log in and out of their account.
The cookie wp_woocommerce_session_ contains a unique code for each customer which corresponds to an entry in the custom wp_woocommerce_sessions table in the database.
If you check your database, you may see that the wp_woocommerce_sessions table in your database is big. To clear this table:
- Go to WooCommerce > Status.
- Click the Tools tab.
- Click the Clear button right next to the Clear customer sessions section.
Boost Your WooCommerce with High-Performance Order Storage (HPOS)
To check if HPOS is enabled, you have to go to WooCommerce settings and find the Features section under the Advanced tab.
If your store is new, then HPOS is already enabled by default.
If your store was created before October 10, 2023, HPOS will not be enabled by default to ensure that your shop will not suddenly face any issues. To enable it:
- Click sync orders now.
- Wait for the orders to be synced.
- Check Enable compatibility mode (synchronizes orders to the posts table). It is advisable to maintain compatibility mode for some time to ensure a seamless transition.
- Save.
- Select High-performance order storage (recommended).
- Save.
- Check HPOS Full text search indexes.
- Save.
Disable emojis
Emojis are little icons used to express ideas or emotions. While these icons are fun and all, are they really necessary for your WordPress site? Especially if you are a business, these are simply adding additional load time which is unnecessary.
When they released WordPress 4.2, they added support for emojis into core for older browsers. The big issue with this is that it generates an additional HTTP request on your WordPress site to load the wp-emoji-release.min.js file. And this loads on every single page. While this file is only 10.5 KB, things like these add up over time.
To disable them, just install and activate Disable Emojis (GDPR friendly) plugin.
Avoid Google Maps
Google Maps are notorious for causing slow load times, and when it’s in your footer it has to load on every single page/post on your website. Probably just use it on your contact page?
Host Google Analytics Locally (or use WP rocket)
If you fetch google analytics from google, then you will have these 3 errors for https://www.google-analytics.com/analytics.js: Leverage browser caching, Reduce DNS lookups and Add Expires Headers.
You can host google analytics locally and avoid these errors. To do so, you can use the CAOS for Analytics plugin.
Be sure to delete any other tracking codes and Google Analytics plugins, and make sure your analytics are still working.
Warning! If you use WP rocket, the method above (with CAOS) will not work! In order to avoid this:
- Just add the google analytics code in your head.
- Make sure that you enable Delay JavaScript Execution in WP rocket.
Use Cloudfare
In order to fix the Use a Content Delivery Network (CDN) error in Gtmetrix, you can use cloudfare. For info on how to install cloudfare, see this relevant post.
To check if your site already uses cloudfare go to Cloudfare diagnostic center.
Use BunnyCDN
A CDN is a content delivery network. In other words, it’s basically a number of servers that are spread all throughout the world that work together to provide fast delivery of content to users no matter where they are located.
Do I need a CDN? The answer is… it depends.
Is the majority of your website traffic in the same continent as your hosting server? If so, you may not want to use a CDN as it can actually slightly slow down your website by adding another layer.
However, if you have a decent amount of your traffic coming from all over the world, then it probably makes sense to use a CDN.
A CDN will cache the content of your website on a number of servers around the world and then when someone goes to access your website, it will pull the data from the CDN server closest to that user which will greatly speed up the time it takes for them to see your website loaded.
- Sign up for BunnyCDN.
- Click Pull Zones.
- Click Add Pull Zone.
- Enter the “Name” of your Pull Zone where your files will be accessible. This will be your website. For example, “grafix“.
- Enter the “Origin URL” of your website that you wish to accelerate. In my case, “https://www.grafix.gr/“.
- Choose the “Pricing zones” where you want your data to be served. Certain geographical zones have different costs. I would recommend leaving all locations checked.
- Last, click “Add Pull Zone” to add your new Pull Zone.
- In Select your platform, select WordPress.
- Copy your provided “CDN Domain” in the “Installation With Third-Party Plugins” section. In my case grafix.b-cdn.net.
- Login to your site.
- Install bunny.net plugin.
- Click bunny.net on the left menu.
- Paste your “CDN Domain Name”.
- Paste your API key.
- Hit “Save Changes.” Now, the URLs of all your static files (images, CSS, JavaScript) will be rewritten to the CNAME(s) that you provided. Congratulations! You have successfully set up BunnyCDN with WP Rocket.
Use Bunny Stream to serve videos fast
- Sign up for BunnyCDN.
- Click Delivery > Stream.
- Enter a Video Library Name.
- Upload the video.
- Click the video.
- Copy the HLS playlist URL.
- Remove the last part and add play_720p.mp4
- Go to Security > General.
- In Allowed Domains, add the domain in the form of *.mywebsite.com
Disable WordPress bloat
- Install and activate Disable Bloat for WordPress & WooCommerce.
- Click the Third party plugins bloat.
- Check the Elementor Dashboard widget checkmark.
- Save changes.
Disable dashboard widgets
- Install and activate Widget Disable.
- Go to Appearance > Disable widgets.
- Click Dashboard Widgets tab.
- Select all checkboxes.
- Click Save changes.
Disable Hotlinking
Hotlinking is the process of adding an asset to your website without uploading it to your server. When hotlinking, you point to the resource from your website instead of hosting the resource. The result is that the asset is displayed on your website, but your server didn’t have to host it.
Your job is to make sure that no one else benefits from the content that you are hosting and paying for.
To protect yourself from unnecessary server load and hosting bills, you should disable hotlinking from your website.
If you have setup CloudFlare (which you should), then disabling hotlinking is a matter of enabling a checkbox.
Just go to Scrape Shield and set Hotlink Protection to on.
To test if you site images are protected you can visit this page.
Control Heartbeat
WordPress uses a Heartbeat API to establish and maintain a connection between a browser and a server. You’ve experienced this when WordPress automatically saves your posts in the background.
On the surface, the Heartbeat API is a useful feature. But, from a performance standpoint, it’s not a good tradeoff as WordPress makes an AJAX call every 15 seconds to the server, which then causes some code to execute on the server. As you understand, it’s not a wise use of CPU resources.
If we were to leave our tab open and leave our computer, that one post alone might generate 5,760 requests in a day!
If you have multiple administrators, or shop managers or editors at your site, it is advised the you change the default 15 sec heartbeat.
If you use WP Rocket, you can do so by:
- Go to WP Rocket > Heartbeat.
- Backend: Disable
Post Editor: Limit
Frontend: Disable
Disable gravatars
No need to use gravatars. No one use them. To do so:
- Go to Settings > Discussion.
- On Avatar Display, untick Show Avatars and press save.
Disable xmlrpc.php
XML-RPC is a feature included in WordPress, which enables data to be transmitted. It uses HTTP as the transport mechanism, and XML as the encoding mechanism. Simply put, xmlrpc.php lets you access your website from custom admin software and mobile applications, rather than through a browser.
Unless you use remote technologies and mobile applications to update your WordPress site, you might not be familiar with XML-RPC. For the uninitiated, you can use xmlrpc.php to establish a remote connection to WordPress, and make updates to your site without directly logging in to your WordPress system.
The problem is that xmlrpc.php poses a security risk. It creates an additional access point to your site, which could leave it vulnerable to external attacks. Every time you authenticate XML-RPC, you need to supply your username and password. As you can imagine, this isn’t exactly ideal for security purposes.
For example, in order to prevent brute force attacks, you can limit login attempts on your WordPress site. However, with XML-RPC enabled, that limit does not exist. There’s no capping on login attempts, which means it’s only a matter of time before a determined cybercriminal gains access.
By disabling the feature, you are closing a potential area of entry for hackers. Of course, without XML-RPC, remote access isn’t possible. You would need to log in directly to WordPress for publishing and updating purposes. Therefore, if mobile apps and remote software are the methods you rely on for site updates, turning this feature off may not be a practical option.
However, if security is your top priority, this may be a step you want to consider. Additionally, if remote connections aren’t something you deal with on a day-to-day basis, you likely won’t miss the feature when it’s gone. In this situation, you have nothing to lose and only an added layer of security to gain.
In order to disable the xmlrpc.php, follow these steps:
- Download and activate the Disable XML-RPC Plugin.
- Go to WordPress XML-RPC validator and check that xmlrpc is disabled. Simply input your site’s address, and then click on Check. If you get an error message, it means that XML-RPC is disabled.
Set Up and Configure Redis Caching
- First, make sure that Redis is enabled on your server.
- Install Query monitor plugin.
- Go to home page and see the number of queries.
- Install and activate Redis Object Cache plugin.
- Go to Redis settings and click enable Object Cache.
- Check that all 3 checkmarks are green.
- Go to home page and see that the number of queries is reduced.
- Deactivate and uninstall Query monitor plugin.
Error logs
Check your error log for your server to see if there are many PHP errors from a plugin/theme. If yes, make sure that you fix the errors.
Learning Resources
- The Ideal WP Rocket Settings For 2021 – With Tips For CDNs, CLS, Fonts, Resource Hints, And Third-Party Scripts: Latest Version 3.9.0.2
- How to Optimize the WordPress Database
- 6 Best WordPress Caching Plugins Compared
- How I Optimized My Slow WordPress Site To Load In .2s (With 100% Pingdom + GTmetrix Scores): A Comprehensive List Of 40+ Up-To-Date WordPress Speed Optimization Tips
- WP Speed Matters
- How to Score 100 on Google PageSpeed Insights: A Complete Guide to Optimizing WordPress Performance and Speed
- The Ultimate Guide to WordPress Speed Optimization
- Setup BunnyCDN with wp rocket
- How To Reduce CPU Usage In WordPress (Make Your Website Run More Efficiently)
- How to speed up WooCommerce