What is SSL and HTTPS?
SSL (Secure Socket Layer) is a protocol used on the web for:
- Encrypting website data so data sent from the browser to the server and vice versa is protected
- Authenticating your website so visitors know your identity has been verified HTTPS just means HTTP with SSL.
Why would you want SSL?
- You are accepting or transmitting sensitive data, such as user details and billing information, and need to keep them safe
- You want to secure logins and signups on your site
- You need to comply with privacy and security requirements
- You want users to trust your site
Types of SSL Certificates by Validation Level
There are three common types of certificates. Choosing the right one will be based on the level of security your website needs.
1. Domain Validation
- Level of Validation: Lowest
- Time taken: Few minutes to few hours
- Indication: A browser with secured HTTPS connection.
2. Organization Validated SSL Certificates
- Level of Validation: Medium
- Time taken: Few days
- Indication: Display company information in certificate details.
3. Extended Validation Certificate
- Level of Validation: Most strict level.
- Time taken: Few weeks
- Indication: A green address bar with company’s name (like in Paypal).
Types of SSL Certificates by Number of Domains
On the basis of the number of domains and subdomains, there are 3 certificates:
1. Single-name SSL Certificates
Protects a single subdomain/hostname.
Example: If you purchase single-name SSL Certificate for www.xyz.com, it doesn’t mean you can secure mail.xyz.com.
2. Wildcard SSL Certificates
Protects an unlimited number of subdomains for a single domain.
Example: If you purchase a certificate for www.xyz.com, it will secure career.xyz.com, help.xyz.com, etc. It will work on any subdomain. However, it will not secure abc.pro.xyz.com.
3. Unified SSL Certificates/Multi-Domain SSL Certificates/SAN Certificates
It allows customers to protect up to 100 domains with the help of the same certificate. They are specially designed to secure Microsoft Exchange and Office Communications environments. It protects different domains with a single certificate with the help of the SAN extension.
Installing an SSL on my server for the first time
Step 1: Issue a CSR
In order to buy an SLL, you first want to issue a CSR from your hosting provider. Here you have 2 options according to your situation (if you are a reseller or if you just have one shared hosting account)
Step 1.1: If you have a shared hosting account
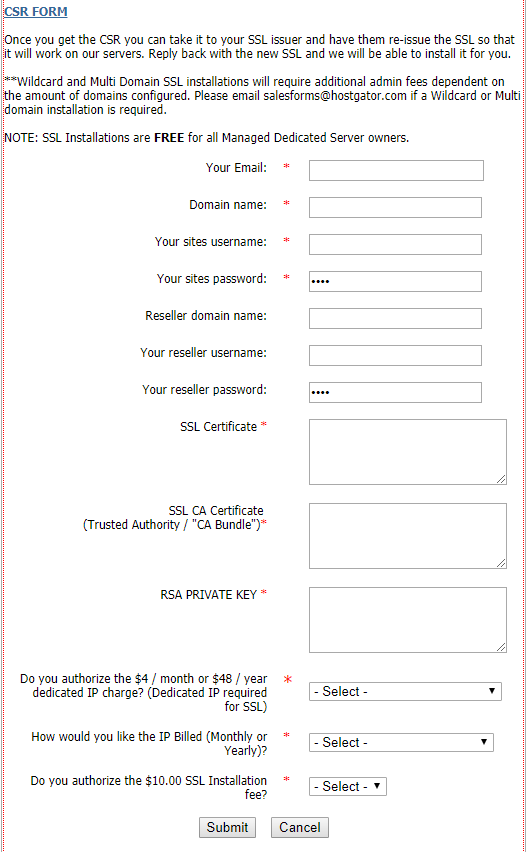
If you host at hostgator, you can do so by completing this form. Please note, that the address and organization information needs to match your WHOIS information for the domain for which you would like the SSL installed on. In order to find them, you must login to your domain acount panel.
Step 1.2: If you are a reseller
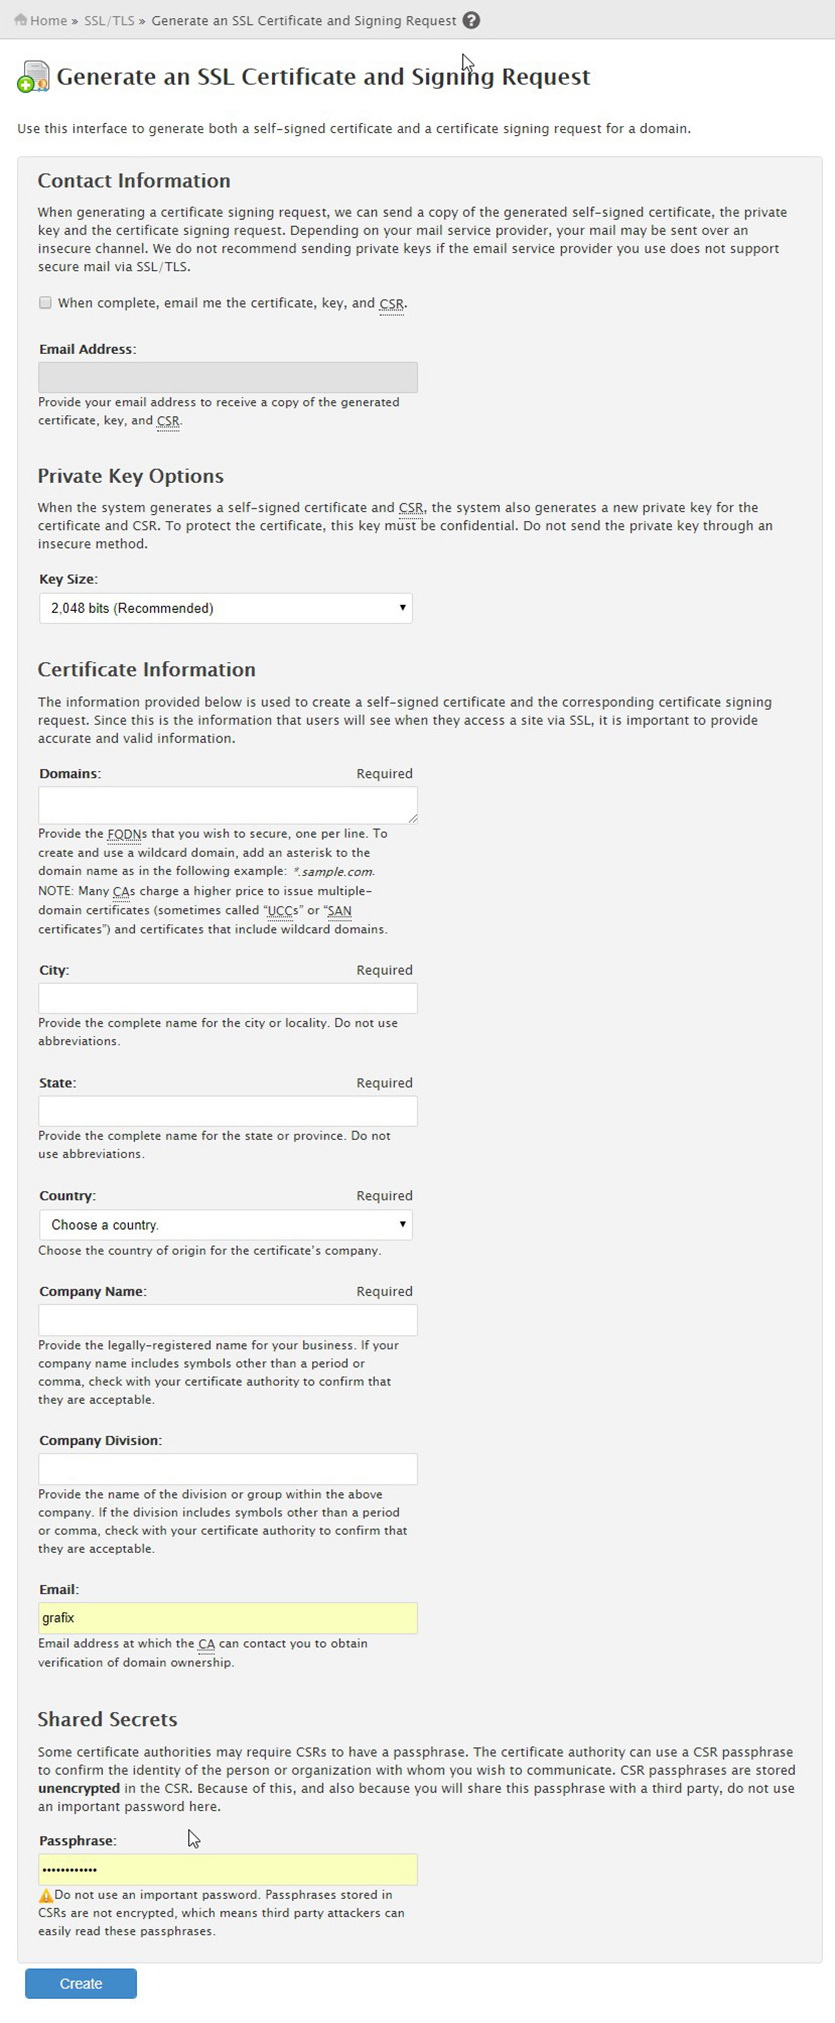
If you are a reseller at hostgator, you can do so inside your WHM panel. Just go to Generate an SSL Certificate and Signing Request page.
Notice: give your personal email in the 2 email fields on the form below. This is where the CSR will be emailed.
Step 2
After completing the form, a CSR, an RSA Private Key and a CA Certificate
(Trusted Authority / “CA Bundle”) will be generated and will be sent by email. Do not delete this email. Keep it cause you will need the RSA Private Key for next year SLL renewal.
Step 3: Buy the SSL certificate
Now, you need to buy an SSL certificate. Many providers sell certificates, all ranging in price; your hosting provider may also sell certificates. Give the CSR to the SSL issuer. The issuer will email you the SSL certificate.
Step 4: Check that your Certificate and Private Key match
Go to this online Certificate Key Matcher and check that your Certificate and Private Key match. Make sure that you copy them directly from the emails, so that you don’t lose the correct format. In the certificate box you enter the SSL certificate along with the SSL CA Certificate from step 5. In the private key box you enter the private key from step 2.
If the certificates match, you will get a message “The certificate and private key match!” and you can go to step 5. If not, repeat step 4.
Step 5
Now, go to your hosting provider and ask them to install the SSL on the server. At hostgator, you can do by completing this form. Hostgator will charge you 10$ to install it for you. Wait until the installation is complete (usually a few hours).
In your email, enter your personal email.
Dedicated IP is not required, so you can select Already have a dedicated IP (even if you don’t have).
Step 6: Test if your website is properly configured for HTTPS
A great resource for testing if your website is properly configured for HTTPS is Qualys SSL Labs. Enter your domain, and click submit. This checks if SSL is configured on your site and also grades the web server configuration and tells you what should be changed to be more secure. Typically these changes need to be handled by your web host.
Renewing an SLL
If you want to renew your SLL, the process is much simpler. You don’t have to generate a CSR, because the SLL issuer will generate the SLL according to the already issued CSR. It is adviced that you do this procedure a week before your SLL expires to avoid any problems or downtime. Here are the steps:
- Find the email from your hosting provider from previous year with the RSA Private key.
- Go to your SLL issuer and renew your SLL certificate.
- Continue with steps 5-10 from the previous list.
Setting up SSL with WooCommerce
To do so:
- First of all, make a backup of your database. You can do so easily by entering the phpMyAdmin and exporting the database to your desktop.
- Install and activate Really Simple SSL plugin.
- Press the activate button that appears after the installation is complete.


