Loco Translate
- Install loco translate.
- Go to Loco translate > Plugins.
- Click WooCommerce.
- Right down from your language (eg. Greek), click move and make sure that Custom is selected (so that you do not lose translations on woocommerce update).
- Click Editor, select strings you want and click save.
Introduction
WooCommerce comes localisation ready out of the box – all that’s needed is your translation (if the plugin does not come bundled with one for your language).
Before you begin
WooCommerce includes a language file (.po or .pot file) which contains all of the English text. You can find this language file inside the plugin folder in woocommerce/i18n/languages/. The default woocommerce frontend translation is inside the file woocommerce.pot. Copy this file and paste it to your desktop.
Translating with PoEdit
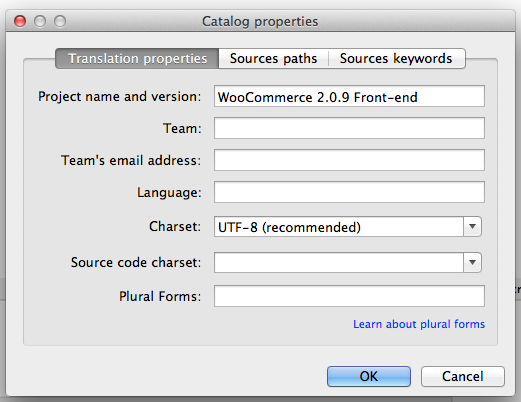
Donwload PoEdit and install. To get started open PoEdit and go to File > New catalog from POT file. Once you have done this, choose woocommerce.pot (the file you ‘ve pasted to your desktop) and PoEdit will show the catalog properties window:
Enter your name etc so other translators know who you are and click ‘ok’. After this you will be prompted to save your .po file – name it based on what you are translating to, for example, a GB translation would be saved as woocommerce-el_GR.po. See the complete list of language codes and country codes to find your exact locale. Now the strings will be listed.
After translating all strings you can save – the .mo file will also be generated automatically.
Setup wordpress
WordPress needs to be told which language it should run under. Open wp-config.php and modify the line below, or add it if it is missing. We’ve set it to Greek in the example below. See the complete list of language codes and country codes to find your exact locale.
define ('WPLANG', 'el_GR');
Finally, you need to include the .mo file you have already generated with PoEdit. To make your localization upgrade safe, create this folder wp-content/languages/woocommerce/ and paste inside the 2 files (the .po and .mo).
Updating your translation
To update your WooCommerce translations, open the .po file, make your changes and just press save. Refresh your WooCommerce page to see the changes.
WooCommerce themes
If you use a WooCommerce theme, it may be possible that the theme contains its own translations for some of the buttons. Check in the theme’s folder and check for a folder named “lang” or “languages” or something similar. Repeat the process above with the po file that you ‘ll find there.
Caching plugins
If you have any caching plugins enabled, make sure that you disable them until your translations are ready.
WooCommerce and WPML
If you use WPML plugin to show the site in multiple languages, than in order to see the translated WooCommerce assets for each language, you should duplicate all the WooCommerce extra pages (Cart page, Account page, etc.).
Also, make sure that you have WooCommerce Multilingual installed in order to see the translated links.
Also, when you delete a product, you will probably want it’s translation to be automatically deleted. To do so, go to WPML > Translation Management > Multilingual Content Setup and tick the ” When deleting a post, delete translations as well” checkbox.


